Triangle Choke – The Complete Guide and Best Practices
The triangle choke is one of the top submissions in BJJ. Effective in both Gi and No Gi grappling, the triangle choke is a versatile finish available from a wide number of positions.
The following article breaks down some of the key triangle entries available in BJJ and discusses some top details that will drastically improve your finishing rate. Finally, you’ll get a sneak peek into some additional submissions that work very well with traditional triangle setups.
What is a triangle choke?
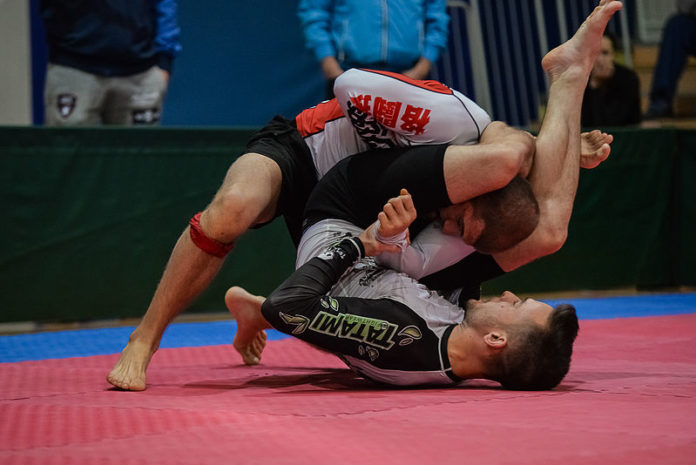
The triangle choke is a ‘head and arm’ choke where you use your legs to put immense pressure on your opponent’s neck and shoulder.
With a proper triangle, the knee pit of one of your legs will cut off one of the carotid arteries. The other carotid artery gets cut off by your crossed feet pushing your opponent’s shoulder into their own neck.
Since the triangle uses the strength of your biggest muscles, namely your glutes, hamstrings, and adductors (inner thigh muscles), you can apply immense pressure with relatively little exertion.
You can attack the triangle choke from a variety of positions. The classic setups occur from closed guard on the bottom, and the mounted position for the triangles from the top.
Sneaky players may also find triangle chokes from top side mount, or sneak in an inverted triangle from bottom as their opponent tries to secure side control.
Finally, the flying triangle may be the ‘slickest’ triangle entry, although it is incredibly risky from both a position standpoint as well as the fact that your opponent can easily ‘accidently’ slam you as you jump up for the attack.
Regardless of where you attack the triangle, you always need ‘one arm in, one arm out’ in terms of having your legs around your opponent’s neck and shoulders.
Securing the one-in, one-out setup is arguably the biggest factor in whether you can attack the triangle.
Without securing the one-in, one-out, pretty much every other finishing detail is irrelevant.
The Classic Triangle Choke from Guard

The most classic version of the triangle choke occurs from closed guard. High percentage triangle finishes involve a proper set up, standard adjustments, and finishing details depending on how your opponent defends.
Setting up the triangle trouble
‘Triangle trouble’ is a colloquial term that refers to having your ankles crossed behind your opponent’s back with one arm in, one arm out, but not having the final finishing setup for the triangle.
Getting to triangle trouble is the first step towards finishing the choke.
Depending on the situation, you may only stay in triangle trouble for a few seconds or less before locking in the finishing details. Or, you may have an epic battle to break posture before advancing the submission. It all depends on your setup and opponent.
The traditional method of drilling the triangle trouble setup involves pushing one of your opponent’s wrist into their waist, opening your guard, and shooting the same-side leg over your opponent’s stuffed wrist and arm up onto their shoulder before locking up the triangle trouble position.
From there, you can make the adjustments needed to finish the triangle choke.
In live situations, most opponents will sense the danger as soon as they feel you try to stuff the wrist and immediately posture up. This makes shooting your triangle trouble setup difficult if not impossible.
A more realistic option is to get a grip on your opponent’s wrist and establish shin-on-bicep pressure. From there, you can slowly climb your way up to clearing their arm to establish triangle trouble.
In Gi, a sleeve grip at the wrist combined with the shin-on-bicep is a great setup. From there, you can place your foot on their bicep for a spider guard setup before shooting your leg all the way over their arm.
In No Gi, a firm grip at the wrist joint coupled with a shin on bicep provides and excellent platform for shooting triangle trouble.
Controlling your opponent’s posture is key to ensuring a good triangle setup. A fully postured-up opponent is very difficult to triangle.
In Gi, keeping your opponent broken down with a lapel grip will help prevent the posture defense.
In No Gi, cupping the back of the head serves a similar purpose and is effective for establishing solid posture control.
Finishing details: triangle choke from bottom
Once you have the triangle trouble established, you are ready to finish the submission.
The key towards a tight finish it is cutting a proper angle to the side as you make adjustments.
Throughout the process, preventing your opponent from posturing up is key to stopping the most effective defense.
To prevent posture and allow the finish, reach up and grab your shin with the opposite hand.
For example, if you shoot your right leg over your opponent’s left shoulder for triangle trouble, reach up with your left hand and grab your right shin, which should be across your opponent’s upper back behind their head.
In this instance, be sure to reach up on the right side of your opponent’s face between their cheek and your left thigh, this puts their head directly between your left elbow and right knee pit.
With the shin grip established, you can now uncross your ankles to make the final adjustment. The shin grip temporarily replaces your left leg as the posturing control. Without a shin grip, your opponent will escape the moment you uncross your ankles.
In triangle trouble, you are typically facing your opponent directly. However, an optimal triangle choke occurs when you are at an angle, with your hips lined up such that you are looking at the side of your opponent’s face or even into their ear (or whatever is left of it after years of grappling).
To cut the angle, place your left foot on their hip and shrimp out to your right to look at the left side of your opponent’s face.
At this point, re-cross your left knee-pit over your right shin and bite down hard with your heel. It is now safe to let go of your shin.
Squeeze your knees together, lift your hips, and get the tap.
Remember your goal is to drive your opponent’s far shoulder (in this example, their right shoulder) into their neck while your right knee pit cuts off the left side of their neck.
If your opponent is stubborn, pulling down on their head will increase the pressure and can land you the submission, although this is not always necessary and should not be relied on excessively.
A perfect triangle should not require pulling on the head – but live BJJ techniques are rarely perfect. If it makes them tap, that’s what matters.
Check out John Danaher and Bernardo Faria breaking down the triangle attack:
The Mounted Triangle Choke Attack
The second common triangle attack occurs when you have the mount position. The mounted triangle principles are similar, however the difference in position often requires different finishing details.
Setting up the mounted triangle
To set up a mounted triangle, you need to have established the full mount control.
From here, work your way up to a high mount by blocking the top of your opponent’s head and slow sliding your hips up onto their chest.
As you do this, work your knees under their elbows and ultimately their triceps to put pressure on their framing defense.
Once you are in high mount, control one of their wrists, in this example take their right wrist with your left hand.
With the right wrist controlled, work your left foot or shin across their right arm until your leg is entirely past their right shoulder.
This is the rough equivalent of the triangle trouble in the mount position. Note that your legs are not yet crossed.
Finishing the mounted triangle
From this one-in, one-out mounted position, lift your opponent’s head off the ground to slide your left calf behind their neck. From here, cross your right knee pit over your left shin to establish a triangle.
Work to push your opponent’s isolated left arm across their face so their bicep is on their carotid. This should be fairly easy now that you have the arm isolated.
Once their arm is across their face, finish the mounted triangle by folding forward as you pinch your legs together. This drives their bicep into their neck while cutting off the other side with your thigh, and typically results in getting the tap.
Throughout this process, keep your hips heavy on their chest to prevent them from escaping and keeping them uncomfortable and distracted.
Adjusting in this final position can help get the finish, however, the adjustments needed vary depending on the physical characteristics of your opponent.
Often, thin-necked opponents are harder to finish from mount because there is less meat to push into their neck.
An alternative option once everything is locked up is to roll to your back and go for a traditional triangle finish from bottom.
Sneaky Triangle Choke Attacks
The two sneaky attacks we’ll cover are the inverted triangle from bottom side control and the jumping triangle from top side control.
Inverted triangle choke from bottom
This triangle occurs when your opponent is careless when finishing a guard pass. It’s most effective against passes where your opponent has an arm between your legs, such as the over-under pass.
In this example, your opponent passes to your right side with their right arm between your legs.
As they fight to secure the position, push their head between your legs and shoot your left leg across their neck, then lock your right knee pit over your left ankle. Pinch your legs, lift your hips, and get the tap.
This inverted variation is lower percentage but can still get the submission. In this example, you will also have your opponent’s left arm trapped, which leaves it vulnerable to the Kimura.
Jumping triangle from top side control
If you have an established side control position and your opponent makes the mistake of straightening their near side arm, you can attack the triangle.
Assume you have passed their guard and are on their right side in side control. Your opponent frames on your neck with their right arm, and mistakenly straightens it.
Quickly jump your right leg across their chest and grab their head to shoot your calf behind their neck. You can pull them all the way over for a traditional finish, or alternatively, keep them on their side facing you and lock your ankles up for the finish.
You probably won’t hit this variation until you already have a firm grasp of the standard triangle, but it never hurts to try.
Triangle Combo Attacks
As you are probably aware, submitting high level players often requires combining multiple threats and forcing your opponent into a trap.
Luckily, the triangle lends itself to two solid submission combos: the armbar, and the Omoplata.

Source: Kelly Bailey – Flickr: Carnage at the Creek 6
Triangle armbar combo
The triangle armbar combo presents itself once you have cut the angle from bottom position.
If your opponent is not tapping, control their posture with a lapel or sleeve grip and uncross your bottom leg before whipping your calf over their face to the back of their head.
At this point, both legs are across their back and the arm is totally isolated. Bridge into their elbow like a traditional armbar and get the tap.
Triangle Omoplata combo
There’s a saying in BJJ that anytime you have a triangle, you have an Omoplata.
To transition to the Omoplata, you need a solid triangle already locked in. From bottom, you’ll notice your opponent’s near side arm is isolated. Stuff this hand ‘into your pocket’ and create a bend in their elbow, isolating and trapping their wrist in your hip.
Uncross your legs and whip your top leg over their head down the closer side of their face and re-align your hips in the same direction as their head.
From here, you should be in the right position to finish the Omoplata. Note that the Omoplata is fairly ‘advanced,’ so don’t be surprised if this one takes a bit to work out the kinks.
Check out this breakdown BJJ black belt Gustavo Gasperin on the triangle-armbar-Omoplata attack series.
Triangle Defense
So far, we’ve focused on the attacking side of using a triangle. However, you must also know how to defend the triangle.
Not only does this prevent you from getting submitted as often, but understanding the best defenses also improves your offense, as you can predict what your opponent’s most effective response will be and pre-empt the escape or counter.
Every black belt will typically have their own preferred method of defending the triangle, however there are a few ‘common steps’ to defend the triangle, depending on how deep you already are in it.
Defense #1: Posture, Posture, Posture!
The most basic preventative defense is to maintain posture. Good posture prevents many triangle setups in the first place.
If you find yourself in triangle trouble, immediately posture up and explosively drive your hips forward. This can often break the triangle trouble, and at the very least will buy you some time.
The better your posture, the harder it is for your opponent to maintain the triangle trouble, and it may fail altogether.
Defense #2: Cancel the Angle, Corkscrew, Dodge the Omoplata
As mentioned in the attacking section, your opponent needs an optimal angle to finish effectively.
You can prevent the angle cut by driving your head towards the leg that’s pressing into your face and pushing it towards the ground with your head. This makes finishing very difficult.
From there, continue to corkscrew in the same direction until you can free your opposite arm.
Your best bet is to stand up and quickly clear your wrist from their hip, otherwise you are susceptible to the Omoplata.
Defense #3: Block, Walk, Feed, Hug
The final defense we will discuss is to place your head down into your opponent’s abdomen, pinch your elbow to your hip, and work into hugging the opponent’s leg as you walk to the side and escape the triangle.
For this example, you are in triangle trouble and your opponent has their right leg over your shoulder.
They will most likely already be breaking your down by pulling your head. Go with it and put your forehead into their abdomen.
Immediately black their hip from moving by C-cupping each side with your hands. As you do this, pinch your right elbow inwards and towards your own hip to trap the opponent’s thigh. Here, reach your left hand all the way under their left thigh as your hug their left knee with your right elbow. This
Once their leg is pinched and hug, walk to your right on your knees. This will put your opponent on their left hip and shut down the triangle attack. Keep your weight on your opponent’s left thigh to prevent any attacks.
Finally, feed your left hand through their legs and cup your head. You can now pull your head all the way out and pass the guard.
Here are Rener and Ryron Gracie breaking this escape down:
Triangle Choke: the bottom line
The triangle is a foundational BJJ submission that every grappler should understand.
Whether your goal is to submit with the triangle, or prevent the submission (or both), understanding these details is a vital aspect of mastering BJJ.
It truly takes years to hone every detail on this seemingly straightforward submission. Furthermore, some details may not ‘click’ in your game, while other details may be the perfect key.
Finally, you will have to adjust your triangle depending on the opponent. The structure of some peoples’ neck requires different angles and pressure.
Nevertheless, you can rest assured that with attention to detail, purposeful training, and relentlessly attacking the triangle submission, you’ll be well on your way towards triangle mastery.
If you are looking for a great instructional on closed guard attacks, including the triangle choke – we highly recommend Henry Akins Closed Guard Attacks.
Having trouble with the triangle position? You might consider working on some flexibility for BJJ.


